Last updated: 20210407
Once your hacked Nintendo Switch is running, highlight any game , then hold on to R and hit A to start the game.
Select a profile.
That’s it, your Edizon should be running!
Hacks, tips, tricks and best practices for developers
Last updated: 20210407
Once your hacked Nintendo Switch is running, highlight any game , then hold on to R and hit A to start the game.
Select a profile.
That’s it, your Edizon should be running!
Last updated: 20210407
Step 1:
First charge up your Nintendo Switch and Pro Controller, and also the RCMLoader device.
Step 2:
Slot the JIG on the right controller slot.
Hold on to the PLUS button on RCMLoader, to switch to BLUE to load ATMOSPHERE PAYLOAD.
Insert the RCMLoader into Nintendo Switch usb port below.
Step 3:
Hold on to VOLUME UP (+) button and hit the ON button to power on the device.
Step 4:
In Hekake, select EMUNAND.
Notes:
”
Emunand with CFW:
Pros-
Being able to use clean sysnand for online play.
Less likely to be bricked.
Cons-
Takes up more space, since you need to duplicate the nand.
Sysnand with CFW:
Literally the opposite of above. That’s it.”
That’s it! Your hacked Nintendo Switch should load.
See also: How to run Edizon on a hacked Nintendo Switch?
1. determine if it’s a timescale difference, or a simple “timing” offsync. (here we talk about the more problematic timescale difference)
2. sync 1st line in SRT, to the video’s first line, save this new SRT as “VIDEONAME.srt”, take note of the time (FIRSTTIME)
3. find the last line in the SRT file, take note of the time. (LASTSRTTIME)
4. find the last line in the VIDEO, take note of the time as well. (LASTVIDEOTIME)
5. head to: https://subshifter.bitsnbites.eu/
6. use Linear correction
7. choose the “VIDEONAME.srt”
8. Time #1 = FIRSTTIME –> FIRSTTIME
9. Time #2 = LASTSRTTIME –> LASTVIDEOTIME
10. Hit Resync! that’s it!
To complete the Google Search Console verification process with Yoast SEO, go to SEO → General in your WordPress dashboard and select the Webmaster Tools tab.
All you need to do is paste your Google verification code into the box:
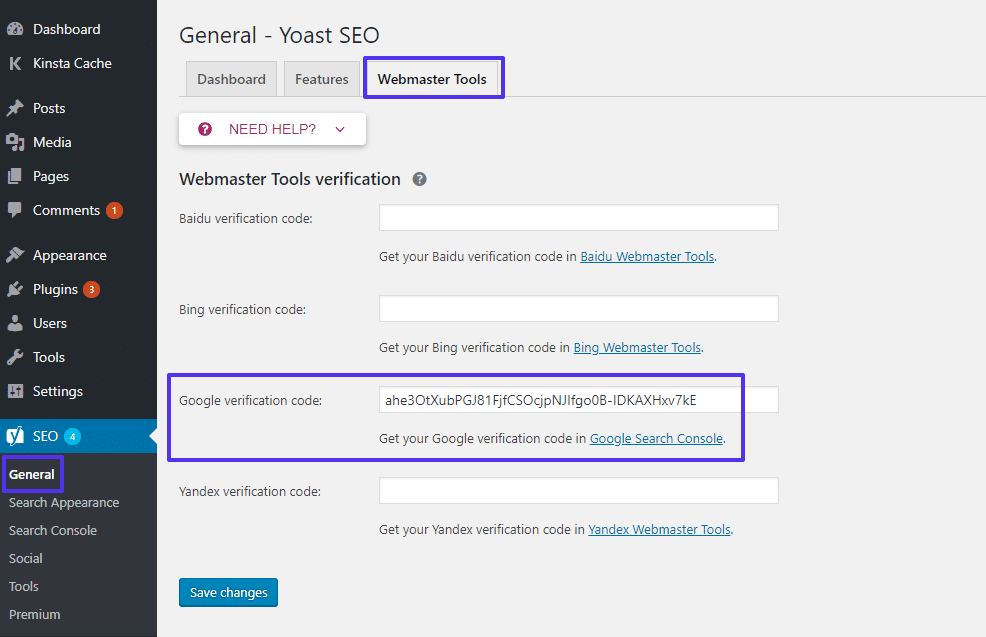
Google site verification in Yoast SEO
To find your Google verification code:
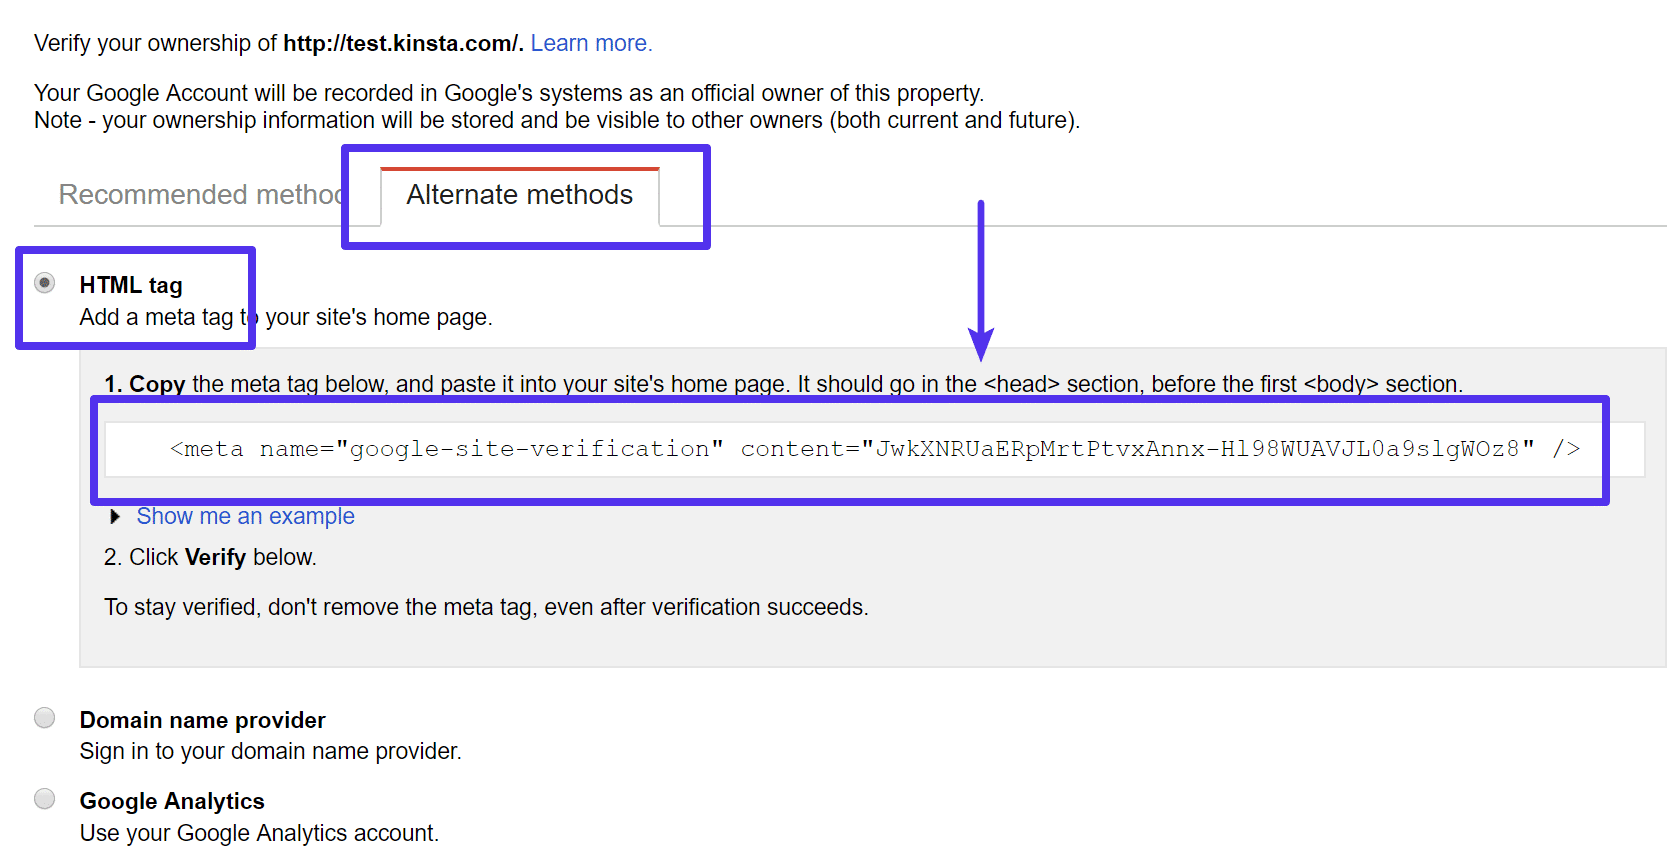
Where to find Google verification code
Make sure to click Save changes in the Yoast SEO interface when you’re done.
Last updated: 20210316
This is application for complex boot ups, using UEFI/EFI instead of MBR (for people who install multiple OSes on a computer)
PS: You may have to repeat these after every major Windows update!
Hardware requirements:
1 x 16GB and above USB FLASH THUMB disk.
1 other working PC.
Software requirements:
Windows 10 installation available online from Microsoft.
EasyBCD (optional)
EasyUEFI (optional)
Step 1: Create the bootable Windows Installation disk by running the Windows 10 installer from Microsoft website above.
Boot into the USB head to Troubleshoot > Command Prompt
In the command prompt that opens, run the disk management tool by typing the command:
diskpart
Display the list of drives on the computer:
list disk
Look for the disks that says “GPT” , EFI partitions are only running on disks using GPT.
Select the disk where the EFI is on:
sel disk 0
Display the list of partitions and volumes on the disk:
list partition

list volume
Assign the EFI partitions to a drive letter we are going to use later:
select volume 1 (example)
assign letter R:
If there’s more than 1 EFI, we can load them as well to check
select volume 2 (example)
assign letter S:
Close the diskpart:
exit
Go to the bootloader directory on the hidden EFI volume:
cd /d R:\efi\microsoft\boot\
Use the attrib command to remove the hidden, read-only, and system attributes from the BCD file:
attrib BCD -s -h -r
Delete the current BCD configuration file by renaming it (this will keep the old boot configuration as a backup):
ren BCD BCD.bak
Using the bcdboot.exe utility, you need to recreate the BCD store by copying the UEFI boot environment files to the boot partition from the Windows directory:
bcdboot C:\Windows /l en-us /s k: /f ALL
bcdboot c:\Windows /l en-uk /s K: /f ALLbcdboot c:\Windows /l nl-NL /s K: /f ALLbcdboot c:\Windows /l de-DE /s K: /f ALL
Now, if you run the bcdedit command, you will see the following :
An entry should appear in the Windows Boot Manager section containing the full path to the UEFI boot file (\EFI\MICROSOFT\BOOT\BOOTMGFW.EFI). In this example, it is located on volume 2 (partition=\Device\HarddiskVolume2).
That’s it!
By now you would have gotten your main Windows running by rebuilding a working BCD to your EFI partition.
What if you have multiple Windows running and you need the other Windows options to appear too?
Boot into the working Windows, run the software EasyBCD and add new installation to your BCD menu.
What if Windows boot menu is not loading, or working, and your system is loading Clover or other boot menus?
Run EasyUEFI and switch the orders of boot menu, you can delete the Windows Boot Manager from the list, and re-add it again if its status is locked as “Hidden”
efi easy efi boot lost partition boot windows upgrade
Last updated: 20210214
If you get the error message when sending a message in Contact Form 7 on your WordPress:
Deprecated: get_option was called with an argument that is deprecated since version 5.5.0! The “blacklist_keys” option key has been renamed to “disallowed_keys”. in /wp-includes/functions.php on line 5143
Then simply do this:
I was able to remove this error by changing the following at contact-form-7\modules\disallowed-list.php, line 51:
$mod_keys = trim( get_option( 'blacklist_keys' ) );
to
$mod_keys = trim( get_option( 'disallowed_keys' ) );
Reference:
https://github.com/takayukister/contact-form-7/issues/170
Use https://codembo.com/en/ for now
Basically upload the subs to youtube, then redownload as .VTT file.
Open it in notepad and add: line: 10% to the timing, so it looks like:
00:00:06.120 –> 00:00:11.120 line:10%
how to change the text colour
and positioning of captions.
See:
https://medium.com/@mlockrey/how-to-change-the-positioning-of-captions-in-youtube-c75bb9ac0aff
Use window.innerWidth or..
window.innerWidth
|| document.documentElement.clientWidth
|| document.body.clientWidth
See:
https://stackoverflow.com/questions/43077348/window-width-returns-different-width-than-indicated-by-chrome-devtools