How to boot computer without a monitor on Windows?

Some graphics cards are not designed to be “headless” and will halt the boot process if no monitor is detected. In those cases, you typically start the computer with a monitor connected, then disconnect the monitor and the computer will (or should) keep running. But do note it is best to power down before connecting the monitor again. While HDMI and DVI are “hot-swappable”, you have to be very careful to align the connectors when inserting so you don’t short any pins while inserting. No worries when the computer is off.

You might also check your BIOS and disable the “Halt on all errors” switch. No guarantee this will work on your computer if it is the card doing the halting, but it is worth a try.

In cases where software does not work, then you need to get dummy plugs:

BUYMINERS.CA 4K HDMI Dummy Plug – Virtual Monitor Display Emulator, Headless Display Adapter Supports up to 3840×2160@60Hz, 1080@120Hz DVI EDID Emulator (Single)


How to Boot Without a Monitor

System administrators often run server computers “headless,” or without a monitor or keyboard, to conserve space. By editing the Windows registry, you can set up default booting instructions so that you can simply turn the power on to the computer without having to log on or view what is going on. This way, you can set up a Windows office server you can maintain from another computer, without requiring an attached monitor to boot it up.

1.
Type “regedit.exe” to open the search bar in Windows 8. Click the entry that appears in the result.

2.
Locate and click the “HKEY_LOCAL_MACHINE\SOFTWARE\Microsoft\Windows NT\CurrentVersion\Winlogon” key in the Registry Editing tool.

3.
Double-click the “DefaultUserName” entry then type the username to use for login in the text box, then click “OK.” Repeat the process with the “DefaultPassword” entry, using the password associated with that account.

4.
Locate the “AutoAdminLogon” entry, and change it from a “0” to a “1.”

5.
Close the editor and restart the computer. It will now automatically start and log in. You can remove the monitor from the computer, and start it simply by pressing the power button on the PC.
How to remove ads and messages from Kaspersky nagware virus?

Last updated: 20210628

So you’ve purchased and bought Kaspersky, and it’s now promoting more software and popping up ads everywhere?

I almost decided not to renew my Kaspersky subscription. Until I found out how to disable the ads and spams from Kaspersky.

https://support.kaspersky.com/common/settings/14038


Good luck!

How to get Google Verification code for Yoast SEO?

Yoast SEO

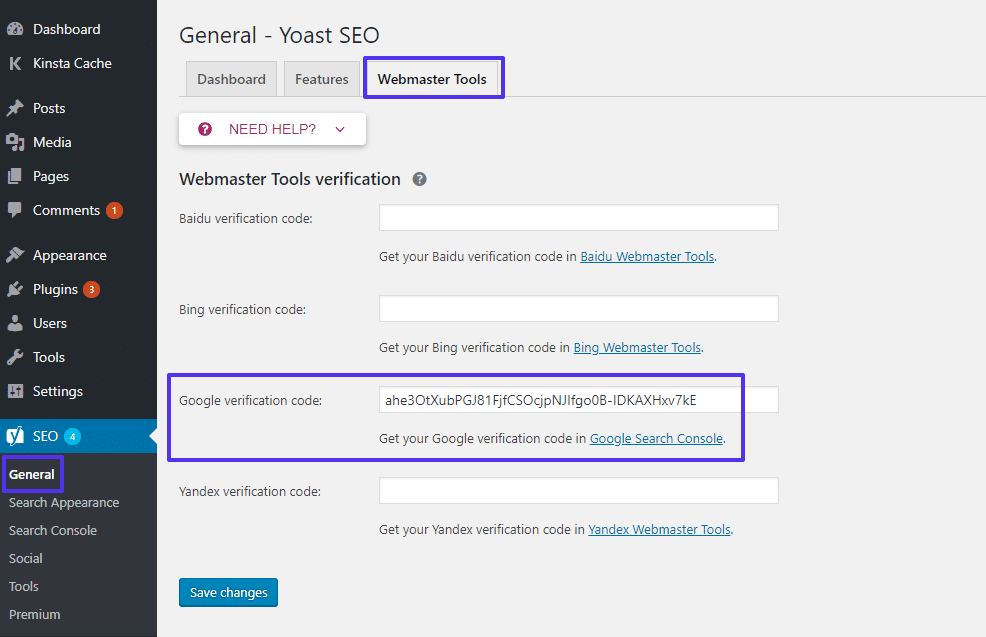
To complete the Google Search Console verification process with Yoast SEO, go to SEO → General in your WordPress dashboard and select the Webmaster Tools tab.

All you need to do is paste your Google verification code into the box:

Google site verification in Yoast SEO

Google site verification in Yoast SEO

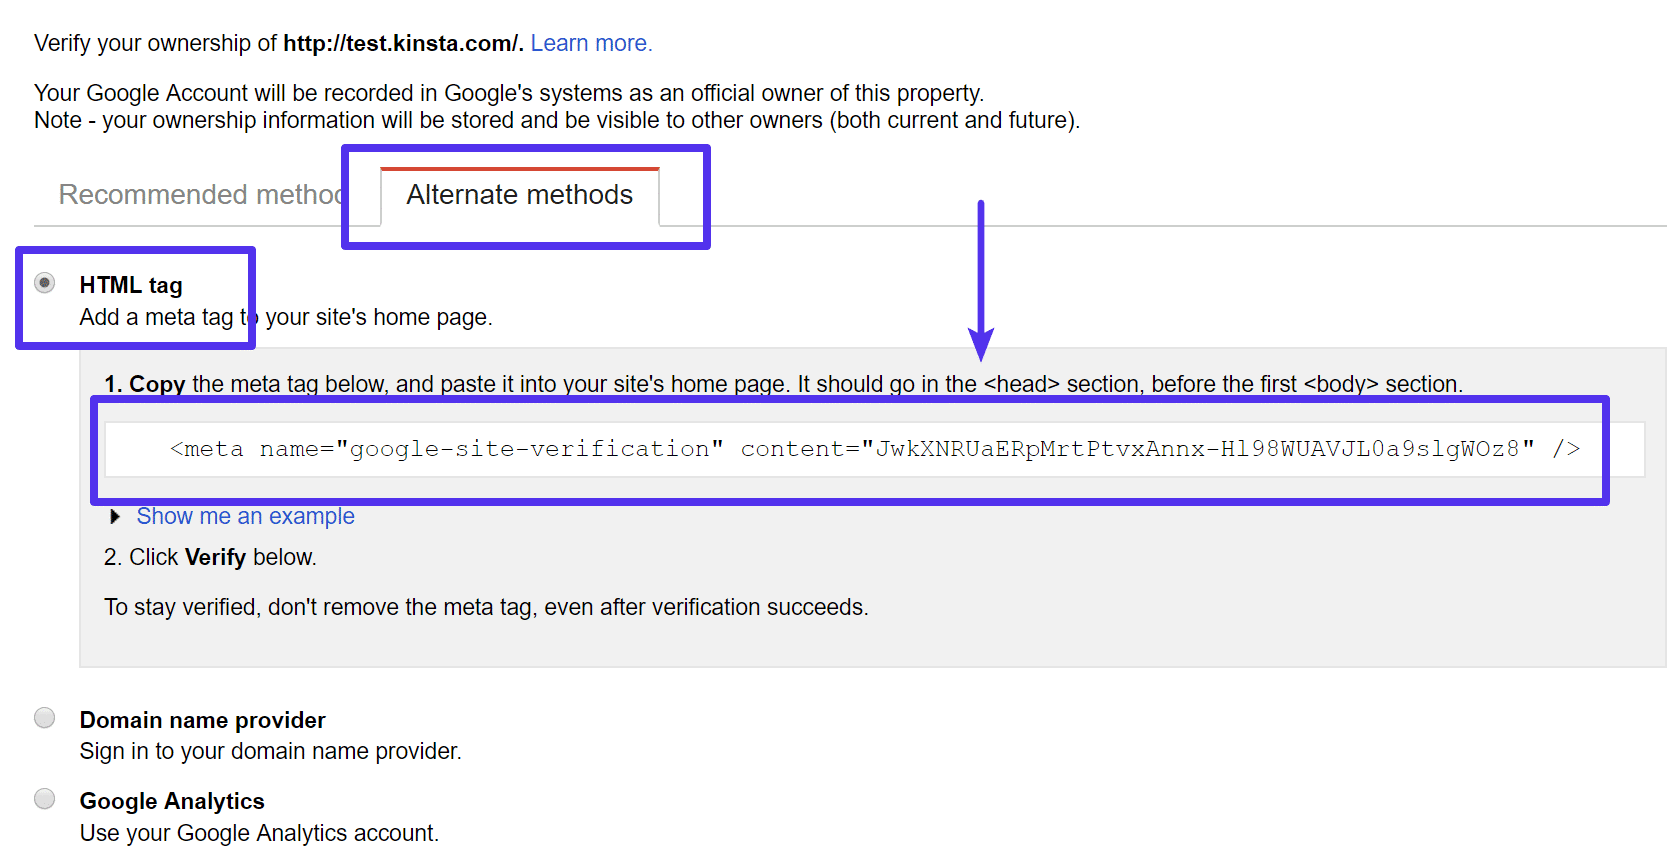
To find your Google verification code:

  1. Go to the Alternate methods tab in the Google Search Console interface
  2. Select the HTML tag option
  3. You can copy the entire tag, the Yoast SEO plugin will automatically strip out the extra, leaving just the code.
Where to find Google verification code

Where to find Google verification code

Make sure to click Save changes in the Yoast SEO interface when you’re done.

How to fix broken or corrupted BCD causing Windows 10 to be unable to boot after Windows updates?

Last updated: 20210316

This is application for complex boot ups, using UEFI/EFI instead of MBR (for people who install multiple OSes on a computer)


PS: You may have to repeat these after every major Windows update!


Hardware requirements:

1 x 16GB and above USB FLASH THUMB disk.

1 other working PC.


Software requirements:

Windows 10 installation available online from Microsoft.

        • https://go.microsoft.com/fwlink/?LinkId=691209
        • https://www.microsoft.com/software-download/windows10

EasyBCD (optional)

EasyUEFI (optional)


Step 1: Create the bootable Windows Installation disk by running the Windows 10 installer from Microsoft website above.

Boot into the USB head to Troubleshoot > Command Prompt


In the command prompt that opens, run the disk management tool by typing the command:
diskpart


Display the list of drives on the computer:
list disk


Look for the disks that says “GPT” , EFI partitions are only running on disks using GPT.


Select the disk where the EFI is on:
sel disk 0


Display the list of partitions and volumes on the disk:
list partition
list volume


Assign the EFI partitions to a drive letter we are going to use later:

select volume 1 (example)
assign letter R:


If there’s more than 1 EFI, we can load them as well to check

select volume 2 (example)
assign letter S:


Close the diskpart:
exit


Go to the bootloader directory on the hidden EFI volume:
cd /d R:\efi\microsoft\boot\


Use the attrib command to remove the hidden, read-only, and system attributes from the BCD file:

attrib BCD -s -h -r


Delete the current BCD configuration file by renaming it (this will keep the old boot configuration as a backup):
ren BCD BCD.bak


Using the bcdboot.exe utility, you need to recreate the BCD store by copying the UEFI boot environment files to the boot partition from the Windows directory:
bcdboot C:\Windows /l en-us /s k: /f ALL

  • C:\Windows – is the path to the directory with the latest Windows 10 installed;
  • /f ALL – means that you want to copy the Windows Boot Environment files, including those for UEFI and BIOS computers (potential ability to boot in UEFI and BIOS systems). To copy only the EFI bootloader, use the /f UEFI command;
  • /l en-us — is a type of the system locale. By default, en-us – English (USA) is used;
  • /c – this is a new BCDBoot option in Windows 10 that allows you to overwrite existing boot records (including debugsettings). Use this option to ignore old boot settings and create a clean BCD configuration;
  • /v – used to enable BCDBoot verbose output.
Hint. If you use a localized version of Windows 10, the command will be different. For example, in the Windows version for the UK, use the following command
bcdboot c:\Windows /l en-uk /s K: /f ALL
Windows 10 Dutch:
bcdboot c:\Windows /l nl-NL /s K: /f ALL
Windows 10 Deutch (German):
bcdboot c:\Windows /l de-DE /s K: /f ALL 

Now, if you run the bcdedit command, you will see the following :

An entry should appear in the Windows Boot Manager section containing the full path to the UEFI boot file (\EFI\MICROSOFT\BOOT\BOOTMGFW.EFI). In this example, it is located on volume 2 (partition=\Device\HarddiskVolume2).


That’s it!

By now you would have gotten your main Windows running by rebuilding a working BCD to your EFI partition.


What if you have multiple Windows running and you need the other Windows options to appear too?

Boot into the working Windows, run the software EasyBCD and add new installation to your BCD menu.


What if Windows boot menu is not loading, or working, and your system is loading Clover or other boot menus?

Run EasyUEFI and switch the orders of boot menu, you can delete the Windows Boot Manager from the list, and re-add it again if its status is locked as “Hidden”


How to get the correct Browser Window width that displays in Chrome Developer DevTools instead of the jquery Window width value?

Use window.innerWidth or..


window.innerWidth
|| document.documentElement.clientWidth
|| document.body.clientWidth


See:

https://stackoverflow.com/questions/43077348/window-width-returns-different-width-than-indicated-by-chrome-devtools

How to fix “Permission to send an SMS has not been enabled for the region indicated” problem on Twilio?

Enable all countries or selected countries here.

https://www.twilio.com/console/sms/settings/geo-permissions


reference:

https://stackoverflow.com/questions/47423741/twilio-permission-to-send-sms-has-not-been-enabled-for-the-region-indicated/47424927