Category: Instructions
How to sample slice move and glide any sample in Cubase 11?
How to show/display chord in Key editor in Cubase?
Last updated: 20201108
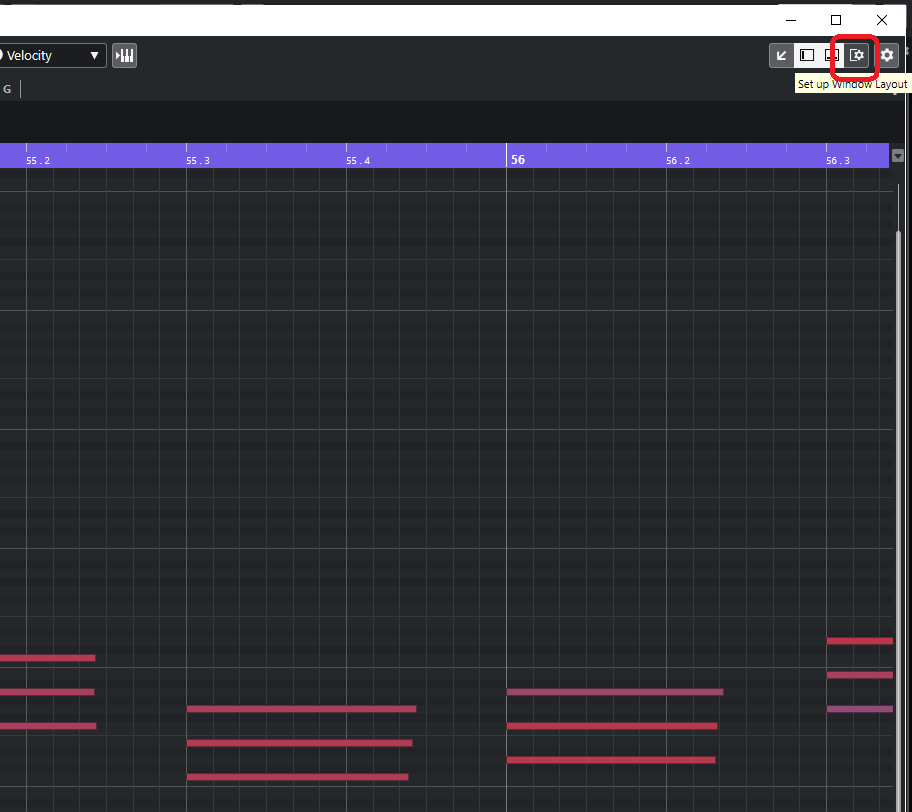
- In the Key Editor / Midi Editor window, look for the Window Layout button and click on it.
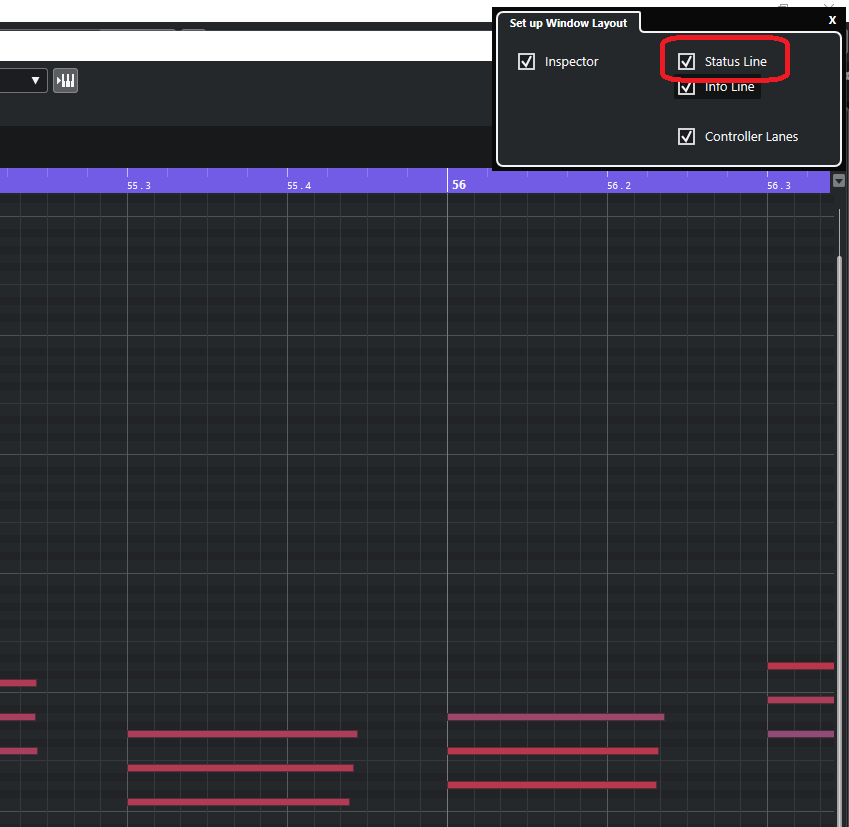
2. Now enable the “Status Line” checkbox.
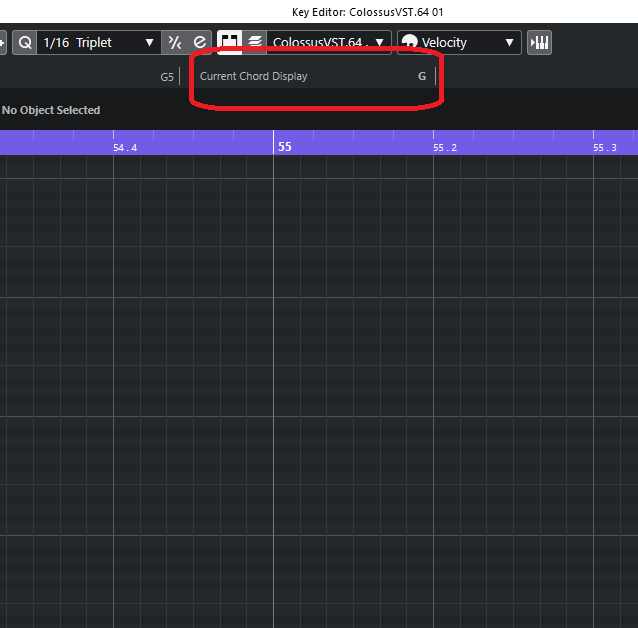
3. Enjoy the “Current Chord Display” information.
Reference:
https://www.steinberg.net/forums/viewtopic.php?t=18369
How to map a fader or knob on Remote SL to Waves EQ vst in Cubase 10?
Last updated: 2020/08/16
First, run your “Automap Server ” software from your Windows search/start menu.
- Then select “Software Setup”.
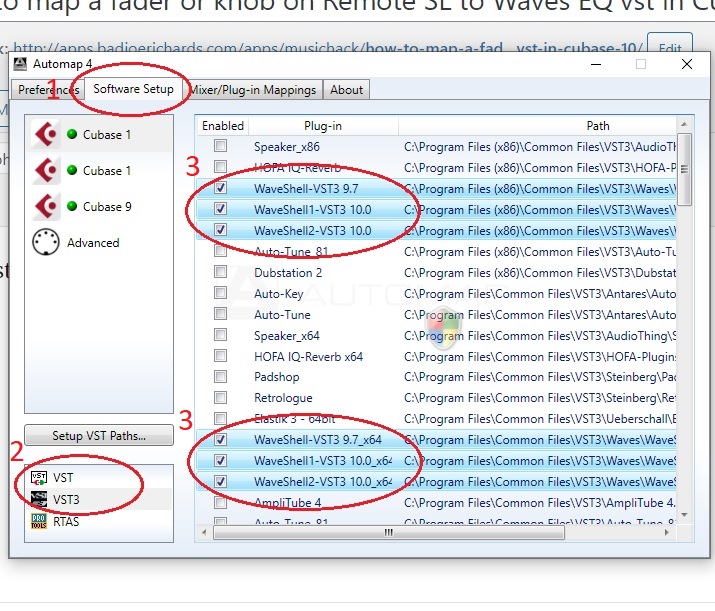
2. Select “VST”
3. Enable ALL instances of “WaveShell-VST3 9.7”, “WaveShell-VST3 10.0” or similar that you can find.
4. Do it for both “VST” and “VST3” selections from the bottom (As seen in 2 in image)
Now launch Cubase, and load an Empty Project.
Add a new Audio track.
Insert “Q1 Stereo” for example.
Your Remote SL hardware should automatically display and map the controls.
You can further add new faders/knobs for controlling by selecting:
- Selecting “Mixer/Plug-in Mappings”
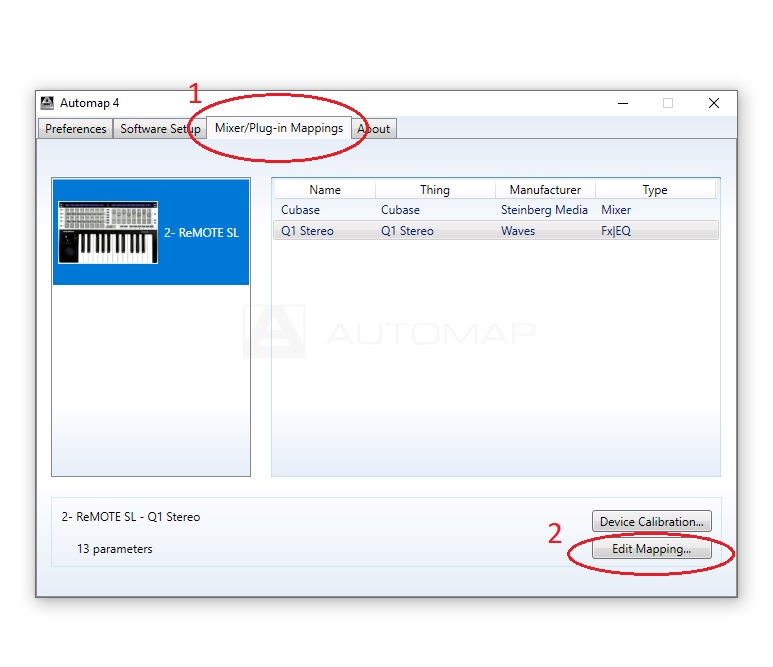
2. Select an empty fader or knob you want to use.
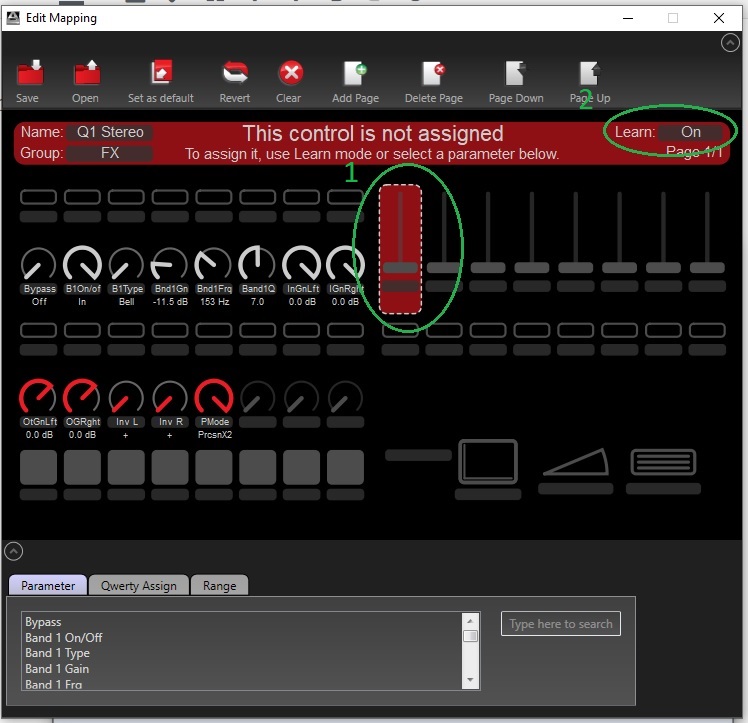
3. Then turn on Learn Mode as seen in Green Step 2 in image above.
4. Now head back to Cubase and adjust the value/knob in Q1-Stereo that you want to change with the empty Fader/Knob from Step 2 above.

5. That’s it! You should see the fader/knob is now assigned and can change your plugin value on the fly.
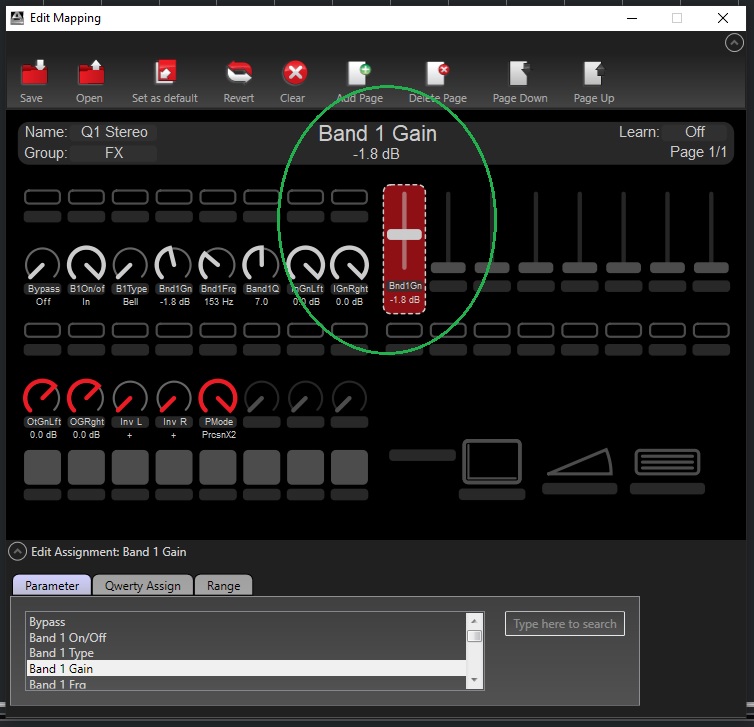
Happy automating!
How to create a new instrument in Kontakt?
Last updated:
20191013
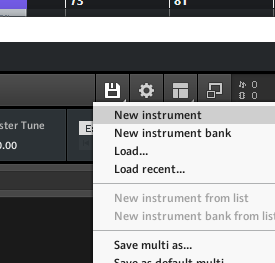
- Open the Kontakt plugin
- Select File > New Instrument
- Enter Edit mode
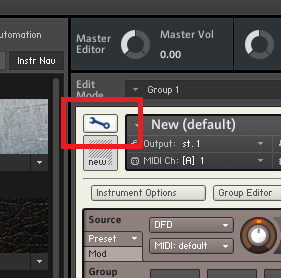
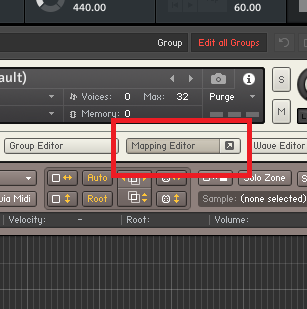
- Open Mapping Editor
- Drag and drop a sample into a key.https://apps.badjoerichards.com/apps/musichack/how-to-drag-and-drop-a-wav-sample-file-into-kontakt-in-the-new-cubase-9-or-10-onwards/
- If TEMPO sync is required for the SAMPLE LOOP, see:
https://apps.badjoerichards.com/apps/musichack/how-to-tempo-sync-a-wav-sound-sample-file-in-kontakt/ - To create different groups of items, i.e. LOOPS with TIME MACHINE PRO, and HITS with DFD/SAMPLER modes, you need to create new groups. Make sure to uncheck ‘Edit All Groups’ ,’AutoSel. Grp’ and check ‘Selected Groups only’
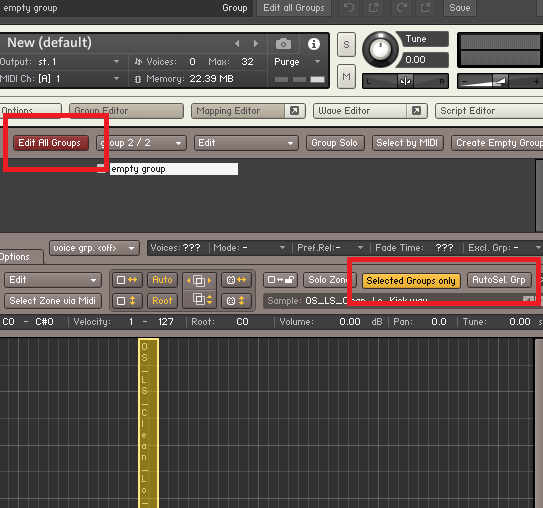
- 8
Super informative video (start from 10minute to create new instrument):
How to use maschine or mikro to work as DAW controller in Cubase?
Last updated: 20201228
We use a combination of Remote device and Mackie Control here. Because it seems Mackie Control in Cubase, we can only use F1-F8 keys only, that’s about 8 buttons/functions. So we use Remote Devices (Generic Remote) for more functions.
Turn off maschine in ALL MIDI INPUT:
- Studio > Studio Setup…
- Midi Port Setup
- Windows midi in > Maschine Mikro 2 in > uncheck ‘In All Midi’
How to add a button using Remote Devices instead of Mackie Control.
20201230: This gives you MORE and UNLIMITED key mapping on Maschine than the limited 8 buttons using Mackie Control.
Studio > Studio Setup > Remote Devices
- Add a ‘Generic Remote’
- Under “Midi Input”, select “Maschine In”
- Click ‘Mute 1’ and hit ‘Add’ – this will create a new control at the bottom of the list
- Rename it to ‘Jeric – Return on Stop cc111’
- Set Midi Channel to 1
- Address to 111
- Max value 127
- At the bottom list, scroll down to the same Controller name in Step 3.
- Set Device to ‘Command’
- set channel Category to ‘Preferences’ (or “Process Plugin” if trying to use a plugin)
- set Value/action to ‘Transport – Return to Start Position on stop’
That’s it! You added a macro to TURN ON or TURN OFF ‘return to start position on Stop’ to CC111. Now in NICE, Pick the Note repeat button > Type: Control Change > Channel 1 > Number 111 > Mode Trigger
You can import from G:\music_projects\20200105_shian_love_song\MASCHINE_MIKRO_SETTINGS\cubase_generic_remote\20200113.xml
To change a key color hack:
Instead of choosing Type: MCU button, switch to Type: Note first, select color, then switch back to Type: MCU button!
How to add a Mackie Control? (to get maschine mikro working as a daw controller)
1. install maschine 2 software, so the MIDI device will show up in Cubase
2. In Native Instruments Controller Editor (NICE), create a new TEMPLATE > Factory Templates > Mackie Control.
https://www.native-instruments.com/forum/threads/maschine-cubase-transport-control-question.324601/ (seems to prefer checking “HOST TRANSPORT CONTROL”)
3. Cubase > studio devices > remote devices > add ‘Mackie Control’
4. Select ‘Maschine Mikro MK2 In’ and ‘Maschine Mikro MK2 Out’ respectively.
By now, your transport controls should be working.
5. Map extra commands you want: use this table:
https://www.native-instruments.com/forum/threads/mackie-control-mcu-parameter-id-codes-template.266581/
Cubase: for example, 54 = F1 , so set up what you want F1 to do in Cubase.
NI Controller Editor: Then map the YELLOW buttons on NI Controller Editor, to make that key send ‘F1’.
6. You can learn to create macros and other functions and map them further:
7. More ways to switch to MIDI input on your NI devices incase you need to know:
https://support.native-instruments.com/hc/en-us/articles/210264145-How-to-Switch-Your-Native-Instruments-Controller-to-MIDI-Mode
8. Unfortunately, there’s no way to IMPORT settings on this Cubase screen yet. So you will have to manually re-map functions on new Cubase installs/upgrades.
Saving and opening configuration in Native Instruments Controller Editor (NICE):
F:\PluginContents\MaschineMikroSettings\20190702_jeric_cubase.ncc
Cubase Mackie Control setup:
https://pasteboard.co/IuUjgT8.png
How to search for a sound or preset by name in Nexus 2?
Have you wondered how to quickly find that sound you used before in Nexus2?
To do so, simply:
- Right click on the list of sounds
- Select ‘new Search’ in the popup menu
- Type in the name you are looking for
- Hit enter.
Here’s a little video:
How I set up my Allen & Heath ZEDi 10fx for my DAW workstation without using USB?
Alright here’s the story, I have been working with my trusted Yamaha MG 10/2 for the past 15 years – and since 2 years ago, Channel 1 died. And just recently Channel 2 also died. Which meant I no longer have any INSERT I/O ports to use, for hack-sending my MIC INPUT to my AUDIO CARD.
Fast forward to today, I decided to go with a modern mixer, with new onboard effects, and great reviews – the Allen & Heath ZEDi 10FX (here on forth known as Z10).
Summary
Pros: The whole mixer is great looking, clean and very little NOISE signal.
Cons: MIC INPUT volume too low if you don’t want to use the GSPRE pre-amp gain too much, when sending MIC IN to your AUDIO CARD. Of course, if you don’t mind the GSPRE pre-amp colour, then MIC INPUT volume to your AUDIO CARD will be just fine.
Made in China
I was under the impression the whole machine would be made in the UK, but to my surprise, after I saw the Chinese text in the manuals, I decided to look for the “Made in.. ” words, and found that the device was “Made in China”..
I love China! And I’m not against Chinese goods, just that in a huge sense, all the audio devices I have grown up with, were made in Western countries – Germany, Finland, UK etc, and for a good reason – the whole pop music culture came from the West, therefore, they have a long history with sounds, sound engineering, waveforms, sonic theories etc – and therefore, when building audio devices, they know the important thing is that they SOUND good.
China and the Chinese attitude can do and build great functioning devices – and the keyword here is “functioning”. Not great sounding – simply because sounding good isn’t a materialistic function – it does not have weight.
So I give it a decade or two, perhaps then Made in China audio devices can be reliably sounding! Ok I digress.
Setup 1 – not ideal
- MICROPHONE XLR MIC IN to Channel M3 on Z10.
- 1/4inch cable insert into FX OUT on Z10.
- GSPRE M3 GAIN set to 40dB. (pre-amp)
- FX GAIN set to 0 on Channel M3.
- MIX GAIN set to 0 on Channel M3.
- Turn on 48V phantom power
- MAIN MIX volume set to 0 on Z10.
- PHONES volume set to 5 (center)
Pros for Setup 1:
- This set up sounds good during playback.
- MIC volume is also good on your headphones.
- Both M3 GSPRE GAIN & MIX GAIN affects the MIC INPUT volume to your AUDIO CARD. The M3 GSPRE GAIN however has a larger range of gain control.
Cons for Setup 1:
- MIC INPUT volume captured to AUDIO CARD is low, around -13.0dB.
- FX OUT is post-mixer, so you can capture MIC INPUT ONLY if the MIX GAIN is more than 0.
Setup 2 – better & loudest (I will continue configure these till I perfect it for my sound)
- MICROPHONE XLR MIC IN to Channel M3 on Z10.
- 1/4inch cable insert into AUX OUT on Z10.
- GSPRE M3 GAIN set to 29dB. (pre-amp) (perfect loudest setting at 37dB)
- AUX GAIN set to 5.0 on Channel M3.
- MIX GAIN set to 5.0 on Channel M3. (perfect loudest setting at 0dB)
- AUX MASTER GAIN set to +5.0.
- Turn on 48V phantom power
- MAIN MIX volume set to 0 on Z10.
- PHONES volume set to 5 (center)
Pros for Setup 2:
- MIC volume is good on earphones.
- MIC INPUT recorded volume determined by M3 GSPRE GAIN only – so adjust this to control how much is sent to your AUDIO CARD.
- AUX is pre-mixer, so you can capture MIC INPUT even if the MIX GAIN is muted.
Cons for Setup 2:
- Recording volume is low at -23. (unless we use the perfect loudest setting in steps 3 and 5 above)
- Only M3 GSPRE GAIN controls the MIC INPUT volume to your AUDIO CARD, but because GSPRE controls the COLOR added to your sound (very obvious when you hear it on your earphones), but some USERS might not mind or hear it. (I DO!)
Setup 3 – USB to PC just for compare (still softer than Setup 2)
- Connected USB to Computer and the Z10.
- ST3 to MIX gain set to 1st tick.
- Cubase set to send audio LEFT to Analogue 3, and RIGHT to Analogue 4.
- You need to install the ZEDi 10fx Audio drivers first!
- MICROPHONE XLR MIC IN to Channel M3 on Z10.
- GSPRE M3 GAIN set to 39dB. (pre-amp)
- AUX GAIN set to 0 on Channel M3.
- MIX GAIN set to 0 on Channel M3.
- AUX MASTER GAIN set to 0.
- Turn on 48V phantom power
- MAIN MIX volume set to 0 on Z10.
- PHONES volume set to 5 (center)
Pros for Setup 3:
- MIC volume is good on earphones.
- MIC INPUT recorded volume determined by M3 GSPRE GAIN only – so adjust this to control how much is sent to your AUDIO CARD.
Cons for Setup 3:
- Recording volume is low at -23 or -18 depending on your M3 GSPRE GAIN.
- Only M3 GSPRE GAIN controls the MIC INPUT volume to your COMPUTER, but because GSPRE controls the COLOR added to your sound (only to your earphones in this case, the recorded sound sounded the same as Setup 2), it might be a bad thing cranking this too loud.
Summary:
I choose SETUP 2 – since the AUX SEND and AUX MASTER allows me to control the MIC INPUT GAIN to my AUDIO CARD.
As you can see, I’ve chosen to use Setup 2, but it’s not perfect, simply because the recorded volume is still slightly soft – at the right amount of GSPRE COLOR to my MIC INPUT. BUT, it’s still WAY louder than using the Z10 USB Setup 3 above.
As I described above, you can still send a louder MIC INPUT to your AUDIO CARD, by adjusting the M3 GSPRE GAIN higher – but this would add more GSPRE COLOR to your sound (especially obvious on your earphones), which may or may not be a good thing, depending on your SOUND SOURCE.
I loved the COLOR and VOLUME from my old Yamaha MG 10/2 , but unfortunately, it’s really NOISY (and it’s dead)! The Allen & Heath ZEDi 10FX sounds really clean compared to it – I’m still happy with my purchase – now my workflow involves post-volume-gain to my recorded MIC INPUT in my DAW.
How to tempo sync a wav sound sample file in Kontakt?
Last updated: 20210705
The idea is simple:
- Drag and map the sound (as seen here: http://apps.badjoerichards.com/apps/musichack/how-to-drag-and-drop-a-wav-sample-file-into-kontakt-in-the-new-cubase-9-or-10-onwards/)
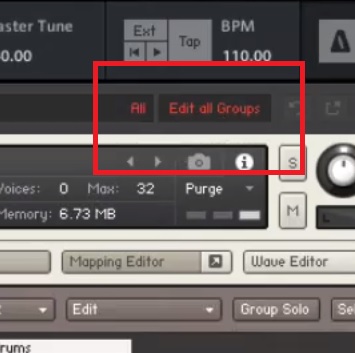
- (not really have to) Make sure you enable ‘Edit All Groups’
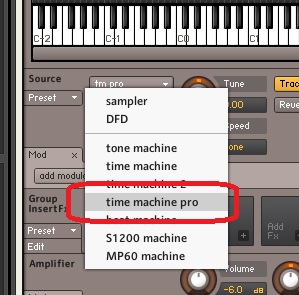
- Change ‘Source’ from “DFD” to “time machine pro”
- Change the Speed to ‘Zone’ (by clicking on the % icon in 100%)
- Double click on the sound to go into Wave Editor mode to edit it
- Turn on GRID and Set the correct BPM for the sound file.
- Now it should tempo sync on playback of the soundwave.
Check out this video:
How to drag and drop a .wav sample file into Kontakt in the new Cubase 9 or 10 onwards?
These issues are occuring because Cubase hides the Kontakt and similar plugin windows when you lose focus to you Mac or Windows explorer folder to start dragging your wav sample file.
So the trick is to drag the file into your Program Icon in Windows Taskbar, drag it up so Cubase comes into focus, before the plugin also shows up, then dragging the wav sample file into the plugin window.
Check out this video: