To expand on this article.
System requirements:
Windows 10 64-bit
Note the 64-bit.
Do you know what I hate most? Re-installing Cubase and all its VSTs and plugins.
This article had to be done. I’m calling this process “future-proof“ing. You will hear me referencing it throughout the article.
My last installation and upgrade took me nearly 2-months to complete, and over a year to finally migrate to the new laptop workstation (Laptop A).
Then the worst happened.
Working on a brand new project on the new workstation, midway throughout, things just kept dropping – I could not edit tracks properly. It was probably a combination of a few things – Windows 10 64-bit, Cubase 8.5 and booting the full OS on a Lacie Thunderbolt 2TB SSD drive (Laptop A was a Macbook Pro Retina 2013 first gen)
With the project timeline already closing, I had to think of a plan, and started building my new music station that runs Cubase 9.5 on my 2016 desktop. (Desktop B)
I had wanted to let my new computer (Desktop B) install while I work on the old workstation (Laptop A) – but I have only 1 dongle – didn’t seem like I could install and test while I work.
Now I have installed Windows 10 cleanly, (before installing Cubase 9.5, make sure to set up your HDD C properly as in section Harddisk Setup and Design) this would ensure certain folders work properly.
and also installed Cubase 9.5 to my Desktop B (without dongle) – separating my Cubase 9.5 program files from the main M.2 NVME SSD drive which my OS is running on, and installing them to a SATA EXPRESS 3 connected HGST 4TB HDD.
The idea is to have my CUBASE 9.5 program, all its plugins, samples etc from today forth, on a separate HGST 4TB HDD (HDD C).
This simple step would future-proof my installation and upgrade of HARDWARE (and software) – which I will explain later.
Without the dongle, my Cubase 9.5 on my Desktop B wouldn’t start.
Harddisk Setup and Design
We will address this beautiful harddisk as HDD C from here on. Our drive letter would be H:\.
Important folders were created when building the new Cubase 9.5 workstation on Desktop B.
- MusicWinProgramFiles
- MusicWinProgramUse
- PluginContents
- MusicProjects
- VST2_32bit_Plugins
- VST2_64bit_Plugins
- VST2_64bit_Plugins\jBridged
- VST3_32bit_Plugins
- VST3_64bit_Plugins
MusicWinProgramFiles – would behave like the Program Files folder which we use everytime a new program needs to be installed. So instead of installing things to the Windows Program Files folder (that is currently residing on my M.2 NVME SSD drive where the OS is installed and running on), we install it to the dedicated HDD C. Cubase 9.5 itself was installed here. Future upgrade installations will also be installed here.
MusicWinProgramUse – would behave like the My Documents folder which you will use to store files and documents that Programs installed to MusicWinProgramFiles will use, i.e. settings, images, etc.
MusicProjects – this is the root folder where all your future Cubase projects should be saved. Naming conventions I use is as follow: 20180812_songnamecurrently
PluginContents – this is where you can place your VST Instruments or plugins’ sample files or data packs. These files/packs are usually large files that are required for your VST plugins/instruments to work.
VST2_32bit_Plugins – behaves like the usual VSTPlugins folder that we usually install all plugins and VSTs to. This phantom folder moves around on every Cubase installation and Windows installation, and has been confusing me and most users for a decade. So, we create a DEDICATED and FIXED location for current and future installations. Point to note is, this folder is specifically for VST2, and 32bit plugins.
VST2_64bit_Plugins – similar to the above, except for 64bit, VST2 plugins.
VST2_64bit_Plugins\jBridged – see section on jBridge. (to write)
VST3_32bit_Plugins – this folder is what I call our MAGIC folder. Basically Cubase and all other plugins that uses VST3 will install files to the LOCKED folders (See: Key Common Folders to note) – which will be magically installed here instead. This is done by symlinking. Do this as soon as you can (like right now, see: Magic VST3 folders and symlink), before installing any VSTs or plugins. Check this and the folder below from time to time, and you see your Plugins automatically installed here.
VST3_64bit_Plugins – similar to the above, except for 64bit, VST3 plugins.
Backups and Backup disks
You should have a separate disk to backup everything, including the OS, your music projects, data files etc. This will be known as HDD Backup, drive letter, X:\.
- DiskBackups (On separate disk)
DiskBackups – here we will schedule and run automated Macrium Reflect disk backups of your current Windows and all its Program and Settings. This will help you in the event of unbootable Windows or lost files. You can disable Windows System Restore when using this.
Magic VST3 folders and symlink
Because VST3 folders are locked on Windows, that means you cannot install VST3 plugins anywhere else except in the Windows drive i.e. C:\Program Files\Common Files\VST3 (for 64bit plugins) , we have to devise a way to keep this behavior, but “magically” save and store files on our HDD C’s VST3 folders. (See: Harddisk Setup and Design)
This process works BEFORE or AFTER you already have any VST3 plugins installed on your computer. Therefore it “future-proof”s our workstation.
- Start by installing Link Shell Extension on your computer. Do install x64 prerequisites. (i.e. http://download.microsoft.com/download/8/B/4/8B42259F-5D70-43F4-AC2E-4B208FD8D66A/vcredist_x64.EXE)
- Copy any contents in C:\Program Files\Common Files\VST3 (for 64bit plugins) to H:\VST3_64bit_Plugins
- Right click on the H:\VST3_64bit_Plugins folder, and select “Pick Link Source” (this appears after you install the item in Step 1)
- Head to C:\Program Files\Common Files\, right click on an empty space in the browser window and select “Drop As > Symbolic Link”
- Delete the VST3 folder that you see here. Feeling safe that you already copied all contents to H:\VST3_64bit_Plugins.
- Rename the folder VST3_64bit_Plugins that you see here, to VST3.
- Now we repeat this for VST3 32bit Plugins. Copy any contents in C:\Program Files (x86)\Common Files\VST3 to H:\VST3_32bit_Plugins
- Right click on the H:\VST3_32bit_Plugins folder, and select “Pick Link Source”
- Head to C:\Program Files (x86)\Common Files\, right click on an empty space in the browser window and select “Drop As > Symbolic Link”
- Delete the VST3 folder that you see here. Feeling safe that you already copied all contents to H:\VST3_32bit_Plugins.
- Rename the folder VST3_32bit_Plugins that you see here, to VST3.
That’s it!
From here on forth, everything should work automagically. All your VST3 plugins that you install henceforth, will magically appear in HDD C.
Some reference:
https://www.howtogeek.com/howto/16226/complete-guide-to-symbolic-links-symlinks-on-windows-or-linux/
Key Common Folders to note
What about VST3 you may ask? Note that VST3 folders are locked to:
- On Windows:
- C:\Program Files\Common Files\VST3 (for 64bit plugins)
- C:\Program Files (x86)\Common Files\VST3 (for 32bit plugins)
You can however, re-arrange plugins and create sub-folders in THAT folder to manage things if you like.
So a few key folders to take note if your future-proofing life:
- C:\Program Files\Common Files\VST3
- C:\Program Files (x86)\Common Files\VST3
Project migration and continuing on better computer (Desktop B)
So I first saved my project on Laptop A at its current state. I could have used Cubase 8.5 > File > Back up Project
But I have already created unique folders on my own, so this time, I simply copied the whole folder to my new Desktop B.
I started by removing dongle from Laptop A and inserting into Desktop B. Starting Cubase 9.5 gave me permissions error with the dongle. To fix that, I run the “eLicenser Control Center” with Administrative privileges (Right click desktop icon > Run as Administrator), then let it perform online maintenance.
My current project is using a few plugins which I must install to continue work, I was able to quickly get these scrolling and looking at the MixConsole on Cubase 8.5:
- Waves
- Autotune
- Supercharger GT
Testing Cubase 9.5 while installing different plugins, would require you run the Cubase 9.5 program, and when we run it the first time, we should set it up to “future-proof” it.
Waves plugin allows you to install all flavors of the VST plugins, i.e. VST2, VST3 and both in 32-bit and 64-bit versions, so in total, 4 of them. We can use this installation to test our setup.
Running and setting up Cubase 9.5 for the first time
Either you are opening your first music project or testing if your VST plugin was installed correctly, some settings here should be set when you see them.
When the first POPUP of news and projects opens up, select “Prompt for project location”, so you can always be sure where to save your new music projects.
Now everytime you create a new project, create a new folder in MusicProjects with the naming convention, 20180812_newsongname.
Windows 10 requires you to lock your sample rate and turn off Windows sounds. See:
Cubase prevent sample rate change when working Windows Sounds
and
How to fix WAV playback too fast or wrong in Cubase, and how to change Sample Rate in Windows 10 for Microbook?
VSTPlugins settings
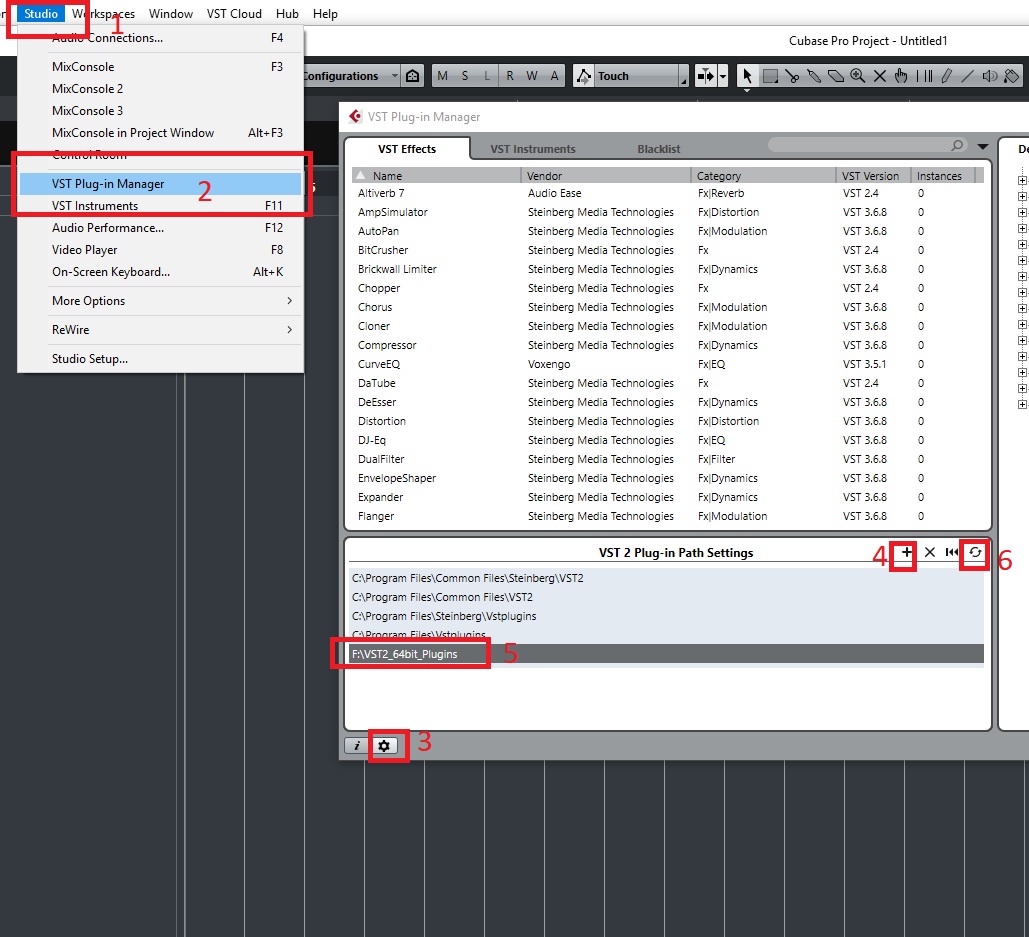
Once Cubase 9.5 loads for the first time, select Studio > VST Plug-in Manager from the Top menu.
Click on the Wrench Icon (Setup) at the bottom left.
Click on the + add icon on the new section that pops up. Add both VST2_32bit_Plugins, VST2_64bit_Plugins folders that were created on your HDD C.
A few good referencing materials:
https://www.steinberg.net/forums/viewtopic.php?t=74462
https://steinberg.help/cubase_pro_artist/v9/en/cubase_nuendo/topics/project_handling/project_handling_backing_up_projects_t.html
Installing new programs and plugins
When installing new programs:
- Always install to MusicWinProgramFiles
- When choosing the folder to install, copy the full Folder’s name & path
- i.e. C:\Program Files\IK Multimedia\T-RackS 5
- Copy the “\IK Multimedia\T-RackS 5” part.
- Then click the Browse or Select button, to select the folder in Step 1.
- If the new path does not include the Folder Name or path, then append it manually.
- For example, if the new path ends up being HDD C:\MusicWinProgramFiles
- Change it to: HDD C:\MusicWinProgramFiles\IK Multimedia\T-RackS 5
When choosing VST folders:
- VST3 should be automatic, using the default folders like C:\Program Files\Common Files\VST3. If it allows you to edit or pick when installing, leave it as C:\Program Files\Common Files\VST3. (Remember we have already MAGIC SYMLINK it to our HDD C? See: Magic VST3 folders and symlink)
- If you are asked to select your VST2 folders, then select your VST2_32bit_Plugins or VST2_64bit_Plugins folders. Take note of the default folder that shows up during installation. Copy it and note it somewhere. (Step A)
- If you are unsure whether it is a 32 or 64 bit, the default folder that shows up can be a hint. i.e.
- If the default folder says C:\Program Files\VstPlugins , then it’s probably a 64-bit plugin.
- If it is C:\Program Files (86)\VstPlugins, then it’s probably a 32-bit.
- Worst case scenario, just pick the VST2_64bit_Plugins folder – then test if Cubase 9.5 sees it. If not, then copy/move it to VST2_32bit_Plugins
- If there is a folder name in Step A, you can copy and append it to the end, so your plugins are more organized. i.e. E:\VST2_64bit_Plugins\Audio Ease
Updates, upgrades and installation of Cubase
So the time will come again when you need to install a new version of Cubase, install it to MusicWinProgramFiles.
When running the installation/upgrade, for my example of Cubase 10, when prompted for folder, replace “C:\Program Files\” with “H:\MusicWinProgramFiles\”.
Other Windows performance settings
See:
https://help.uaudio.com/hc/en-us/articles/214429386
https://help.uaudio.com/hc/en-us/articles/214428366-Windows-Setup-Required-Settings#WinTB